The Raspberry Pi photo frame is a perfect setup for anyone who wants to display photos of their loved ones, memories or anything else might want to display.
This is a pretty straight forwards project and shouldn’t take you too long to setup. I pretty much only cover the software side of things in this tutorial there are some pretty cool frame designs/ideas out there if you want to extend this further.
If you want to see a video on how this tutorial is done, then be sure to check out the one below. I go through everything you need to know for getting this project working.
Equipment
The equipment that you will need for this digital photo frame is listed below.
Required
- Raspberry Pi
- 4 GB SD Card (8 GB+ Recommended) or Micro SD Card if you’re using a Raspberry Pi 2 or B+
- Ethernet Cord or Wifi dongle
- External Hard drive or USB Drive
- Touch Screen or LCD screen
Optional
Hardware
For this project I am just using the official Raspberry Pi touch screen that I purchased earlier this year. However, you can use pretty much any screen that you can get your hands on. Just make sure you can hook it up to the Pi either over the DSI port, HDMI port or using a custom HAT.
If you’re looking for some 3D printable frames for either the official touch screen or just a spare screen you have, then thingiverse has some pretty cool designs. You can find then over atthingiverse.com.
Setting Up the Raspberry Pi Photo Frame Software
In order to get this all setup correctly we are going to need to do a bit of setup on the software side of things.
Firstly, we want to prevent the screen from going blank. This is a power saving setting on the PI.
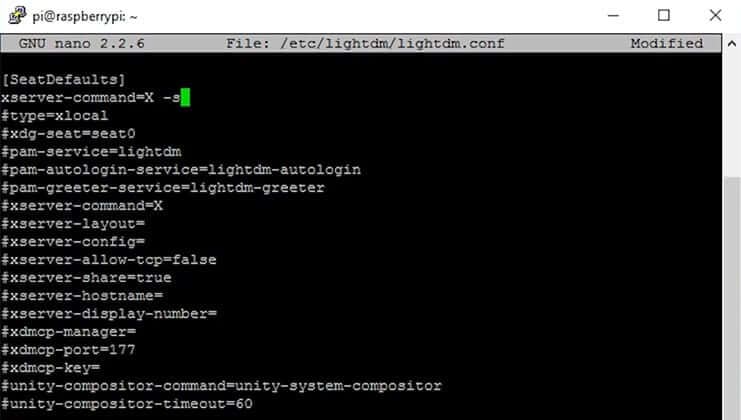
- To turn off screen blanking open up the lightdm.conf file.
sudo nano /etc/lightdm/lightdm.conf - Now in here add the following line anywhere beneath the [SeatsDefaults] line.
xserver-command=X -s 0 –dpms
- Save & exit by pressing ctrl+x and then y.
- Now reboot the pi and the screen should no longer switch off after 10 minutes of inactivity. To reboot simply run the following:
sudo reboot
If you want to be able drag and drop your images onto the Pi you may want to look at setting up a network attached storage. Will allow you to setup a folder that is available on your local network. If you’re in doing such a thing, then my guide on a Raspberry Pi Samba server will take you through all the necessary steps.
I also highly recommend that you setup SSH so you will have remote access when the slideshow is in action. There is no easy way to exit the slideshow unless you turn the device on and off and don’t have it automatically starting.
To setup our slideshow we’re going to use the feh package. Feh is image viewer and cataloguer. It is a fast image viewer that doesn’t get bogged down with huge GUI dependencies. I chose this as it was the most lightweight package that worked without any huge complications.
- To install the package, use the following line:
sudo apt-get install feh - Now to test that it works enter the following line. Replace
/media/NASHDD1/testwith the directory that contains all your image.DISPLAY=:0.0 XAUTHORITY=/home/pi/.Xauthority /usr/bin/feh --quiet --preload --randomize --full-screen --reload 60 -Y --slideshow-delay 15.0 /media/NASHDD1/test - Now we can use short tags to make this command a lot shorter. You can read more about all the flags you can use over at the feh manual page.
DISPLAY=:0.0 XAUTHORITY=/home/pi/.Xauthority /usr/bin/feh -q -p -Z -F -R 60 -Y -D 15.0 /media/NASHDD1/test
- Now as you will notice this locks up the command line bar. To fix this just add the & after the command and the script/process will launch in the background.
- So now let’s store this in a simple script file. This way you can add or change it later. To make the file enter the following command:
sudo nano /home/pi/start-picture-frame.sh - In here enter the following lines:
#!/bin/bash
DISPLAY=:0.0 XAUTHORITY=/home/pi/.Xauthority /usr/bin/feh -q -p -Z -F -R  60 -Y -D 15.0 /media/NASHDD1/test
- Now that’s done you can test it by running the following command(Ctrl+X):
bash /home/pi/start-picture-frame.sh - Finally let’s have it start at boot. Now it is important that you have SSH enabled so you can access the PI remotely as you will lose access to the GUI/Screen. So make sure you have done this before setting it to launch at boot up.
- To do this open up the rc.local file by entering the following command.
sudo nano /etc/rc.local - Add the following before the exit 0 line in this folder.
bash /home/start-picture-frame.sh & - If you ever need to kill the process as you want to be able to access the screen again enter the following line.
sudo pkill feh
You should now have your very own slideshow of pictures going. If you end up with any troubles, then double check all the steps and look for any errors. If you’re still having trouble drop a comment
I hope you have been able to get your Raspberry Pi photo frame working correctly. If you have a trouble, extension you would like to share or anything else then be sure to drop me a comment below. As always if you like my stuff be sure to follow Pi My Life Up on any major social network.
View more at: http://bit.ly/1XReQFr
Post a Comment