In this tutorial we’re building a Raspberry Pi motion sensor that makes use of a PIR sensor (Passive Infrared Sensor). Also to make this project a little more interesting we will also be using a piezo speaker whenever motion is detected. Both these devices will need to be hooked up to the GPIO pins in order to work.
If you like to see a video on how this Raspberry Pi motion sensor is done the be sure to check out the video I have prepared below. If you like the video be sure then please be sure to subscribe so you stay up to date.
Equipment
In order to do this project, you will need some equipment this includes a Raspberry Pi PIR sensor and a piezo speaker.
- Raspberry Pi
- SD Card (8 GB+ Recommended) or Micro SD Card if you’re using a Raspberry Pi 2 or B+
- PIR Sensor
- Piezo speaker
- 1x 100-ohm resistor
Optional
- Ethernet Cord or Wifi dongle (These are only required if you plan on remotely controlling the Pi)
- GPIO Breakout Kit Assembled
- Breadboard
- Breadboard Wire/Jumper Cables
Whilst the breakout board, breadboard and the wire are optional I do highly recommend using these as they will make your life a lot easier. Also be sure to check out some of the best Raspberry Pi casesyou’re able to get.
Raspberry Pi PIR Sensor Hardware Setup
We will be putting together a simple circuit that makes use of a PIR sensor and also a piezo speaker.
A PIR sensor is most commonly seen in security systems to detect movement before sending the alarm off. They detect motion whenever there is a change of infrared temperature in their field of view.
Most PIR sensors have some adjustable screws on them that will allow you to adjust both the time and sensitivity of them. The time will allow you to set a delay before it will go off (Send a high signal). (About 2-4 seconds). The sensitivity is how much movement needs to occur before it will go off.
The piezo buzzer is a simple speaker that outputs a sound whenever a current is run through it. In this circuit the buzzer will give a loud beep whenever the motion detector circuit is triggered.
A breadboard isn’t necessarily required for this project but I would highly recommend using one. They make prototyping and building circuitry a lot easier.
You don’t have to use a breadboard like I am you can just simply hook these straight up to the Raspberry Pi.
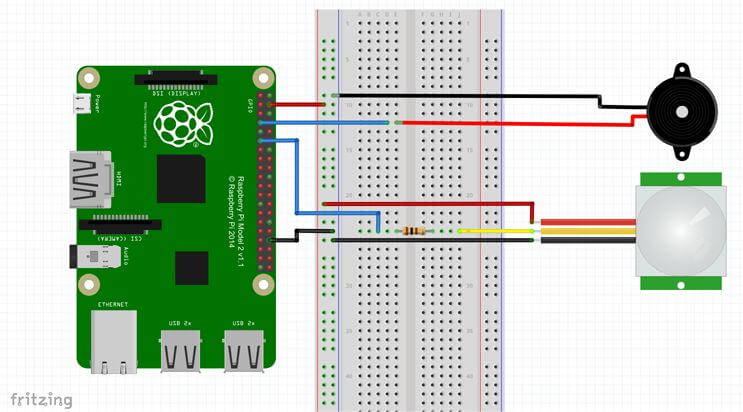
To construct the circuit simply do the following.
- Run a ground pin to the ground/negative rail on the breadboard.
- Run a 5v pin to the positive rail on the breadboard.
- Connect the piezo buzzer to pin 7 (Red wire) and the negative rail (Black wire).
- Run a wire from pin 11 to the breadboard. Place a 100-ohm resistor at the end of the wire. Then connect this up to the yellow wire of the PIR sensor.
- Now for the PIR sensor run the red wire to the 5v line and the black wire to the ground rail on the breadboard.
Raspberry Pi Motion Sensor Software Setup
In order to bring our Raspberry Pi Motion sensor circuit to life we will need to do a little programming. This is relatively easy and much like our introductory post to the Raspberry Pi GPIO pins is a really good way to learn the basics of python.
Firstly, on your Pi enter the following command to create a python script and load it in the nano text editor.
sudo nano motion_sensor.py
Alternatively can download the full script by entering the following command if you don’t feel like writing it out or you can grab it here.
sudo wget http://bit.ly/1sCWBth
I will briefly explain what each part of the code does.
Firstly, we import the GPIO & time Python packages as we will need these to be able to interact with the GPIO pins and also pause our script.
We set 3 variables, the first 2 are references to our pins and thus I have named appropriately. The current state variable is where we will store our sensor state. If this is 0 then it is off or 1 means it has been activated.
We also set our GPIO mode to reference the physical numbering of the pins rather than the actual numbering. This is a little easier to understand/remember as all the pins are numbered in order.
We also setup our GPIO pins to be either outputs or inputs. For example, we want to detect motion so our PIR sensor will be an input. On the other hand, our piezo buzzer is going to need to act as an output.
import RPi.GPIO as GPIO
import time

pir_sensor = 11
piezo = 7

GPIO.setmode(GPIO.BOARD)

GPIO.setup(piezo,GPIO.OUT)

GPIO.setup(pir_sensor, GPIO.IN)

current_state = 0
In this next part we have an infinite while loop. This means it will never exit because it is always true. (You can still cancel the script by press ctrl+c in the terminal).
We begin by putting the script to sleep for 0.1 seconds. After this we get current state of the sensor and if it is 1 (eg. detected motion) then we run the code inside the if statement. If it isn’t 1, then we continue to loop constantly checking the sensor.
The code in the if statement sends the piezo buzzer to high that should emit a noise. The script will do this for a second then turn the buzzer off. After this it will wait for another 5 seconds before exiting the if statement and then checking the Raspberry Pi PIR sensor again.
We have also nested out code within a try, except, finally block. We have added this because we will need to use the keyboard to stop the script. It also very important that we run GPIO.cleanup() to ensure our script cleans up nicely. The try, except, finally code allows us to do this.
try:
    while True:
        time.sleep(0.1)
        current_state = GPIO.input(pir_sensor)
        if current_state == 1:
            print("GPIO pin %s is %s" % (pir_sensor, current_state))
            GPIO.output(piezo,True)
            time.sleep(1)
            GPIO.output(piezo,False)
            time.sleep(5)
except KeyboardInterrupt:
    pass
finally:
    GPIO.cleanup()
Once you have finished working in the script it’s now time to turn it on and test it out. To do this enter the following command:
sudo python motion_sensor.py
If you move in front of the Raspberry PI PIR sensor, then it should turn the piezo buzzer on and emit a noise.
If it doesn’t then is likely you have hooked up wires to the wrong pins or there is an error in the code. If it is a code error you will most likely see an error in the terminal of the Raspberry Pi.
This tutorial is pretty basic and only the beginning of the many applications you can use the PIR sensor. You can get it trigger all sorts of things from something as simple as a counter (counts as people/cars/things go past it), a Raspberry Pi camera, activate a different script and lots more
I hope you enjoy this Raspberry Pi motion sensor tutorial and have been able to build a cool circuit and bring it to life with code. If you have any feedback, thoughts, troubles or anything else feel free to drop us a comment below.
View more at: http://bit.ly/1XReQFr
Post a Comment