In this tutorial I will be going through steps to making your very own Raspberry Pi music player. This process is pretty straightforward so you shouldn’t come across many problems at all.
In this project I am going to be using a prebuilt software package called the Pi Musicbox. This contains plenty of features & functionality that make it great as a Music player.
This is a headless music player so you will need to use a different device to be able to control it. The good thing is you can pretty much use any device that has a browser to be able to interact with it.
If you want to see how this is done visually then be sure to check out my full video below. It goes through all the steps to getting this setup and working correctly in no time at all. If you do like the video be sure to subscribe so you stay up to date.
Equipment
The equipment that you’re going to need for this Raspberry Pi music player is listed below. I have also made a mention of a few devices you can use to get better audio from the Pi.
Required
- Raspberry Pi
- 8 GB SD Card or Micro SD Card if you’re using a Raspberry Pi 2 or B+
- Ethernet Cord or Wifi dongle
Optional
- Raspberry Pi Case
- USB Keyboard
- USB Mouse
- External Hard drive or USB Drive (For storing local music)
Now since this project is completely based on audio it might be worth getting a USB Audio Card or a Raspberry Pi soundcard.
There two supported add-on audio card brands and they are HiFiBerry and IQAudio. (These both typically require the GPIO pins) however most audio cards that are built for the Raspberry Pi should work as this is based on Raspbian.
Installing Raspberry Pi Music Player
To get this project up and going we’re going to be using a prebuilt image. This is a pretty straight forward process and won’t take too long to do at all.
Download & Format the SD Card
- First we need to download the Pi Music Box zip from their website here.
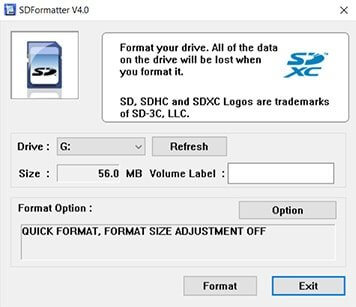
- You are also going to need a formatting tool. To get one simply visit the SD Association’s website and download SD Formatter 4.0 for either Windows or Mac.
- Follow the instructions and install the formatting tool.
- Now insert the SD card into the computer or laptop’s SD card reader and check the drive letter allocated to it, e.g. G:/
- In the SD Formatter tool, select the drive letter for your SD card (eg. G:/) and then press format.
Install the Motion Pie Image onto the SD Card
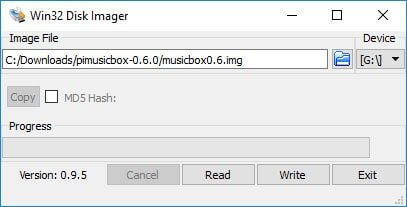
- Firstly, if you don’t already have it then download the Win32DiskImager.
- Now unzip the Pi Musicbox ISO file so you can install it onto the Pi safely.
- Select the Pi Musicbox ISO file and the drive letter your SD card is assigned (Eg. G:/)
- Confirm you have the correct details and click on Write.
- If you’re using a WiFi Dongle you will need to make quick edit to the settings.ini file. This can be found on the SD card we just wrote to. Simply go to the SD Card and open up the config file and then open up the settings.ini file. If you prefer to setup your WiFi manually see my guide on it setting up the Raspberry Pi WiFi via commandline.
- In here add the wifi network name and the wifi password next to the correct fields and then save and exit.
- Once you are done simply eject and remove the SD card from your computer.
Booting/Setting up the Pi MusicBox
Now we’re all good to connect everything up and turn the Raspberry Pi on. Now we will be opening up the Music box in a browser so it’s very important that you have an Ethernet cord or WiFi dongle connected. (The WiFi dongle required a bit of extra setup mentioned above)
To connect to the Raspberry Pi music server, open up browser and enter the following URL.
http://bit.ly/1sCWuxN
If this doesn’t work or you’re using an Android device, then you will need to use the IP of the Raspberry Pi. If you have your Pi connected to a screen you should be able to see the IP in the command line.
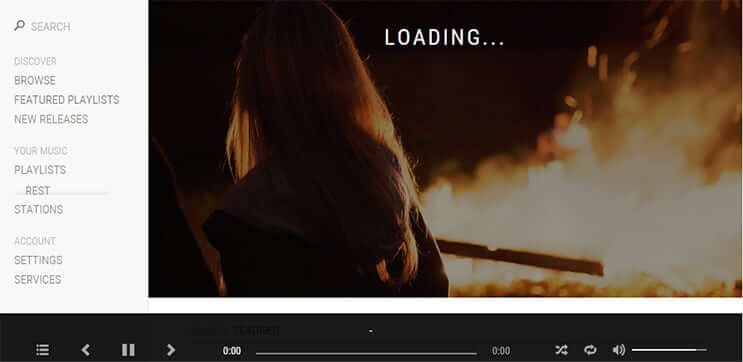
Once connected in your browser you should be presented with a screen like the one below.
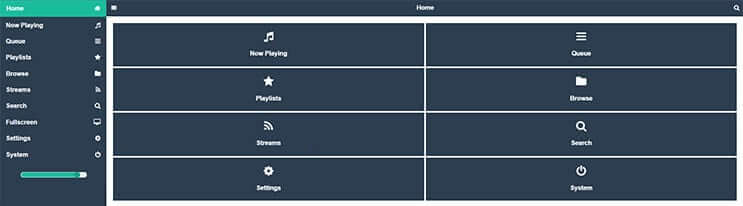
I am just going to mention some of the things you can setup so now go to settings. You will find the settings in the following order.
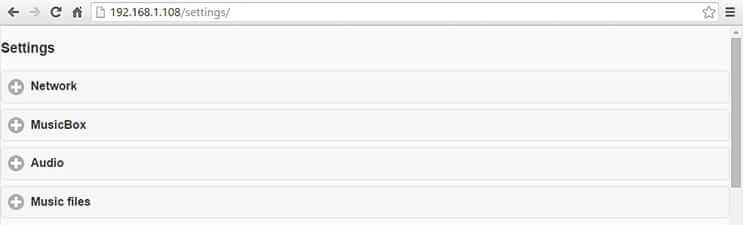
Network
In here you will find all the network settings you will need to correctly setup the Raspberry Pi music player.
- Wifi Network name: This is the SSID or the name of your WiFi network you wish to connect to.
- WiFi Password: The password required to access the local network.
- Workgroup: This is the workgroup name of the local Windows network.
- SSH: Only turn this on if you need to edit the Pi remotely via the command line. Check out the SSH tutorial if you need more information on using SSH correctly.
MusicBox
In here you will find general settings for the Musicbox. You probably won’t need to change any of these but I do highly suggest updating the root password to the device.
- Device Name: This is the name of your Pi and how it would be called on your local network. Change this if you wish it to be something different to “musicbox”. Keep in mind changing it will change the URL in the bowser to the new name.
- Autoplay Url: You can enter a URL here to start a radio station or stream for when the device boots up. If it doesn’t automatically start you can increase the wait time to a little higher
- Wait Time: The time it waits before playing the autoplay URL after boot. The time is in seconds.
- Root Password: By default, the root password to the device is “musicbox” this should be changed to something more secure especially if you are going to enable SSH.
- AirPlay Streaming: This allows you to stream directly from your iOS device to the Raspberry Pi Music Server. When enabled this should show up in your AirPlay device list.
- DLNA/uPnP/OpenHome Streaming: If you need to stream over any of these protocols then simply enable this.
Audio
- Initial Volume: This is the volume that the device will start at by default.
- Audio Output: Here you can manually select the output for the audio.
- Down sample USB: Enable this if you’re having trouble with the quality of the audio. Typically, if you’re on a Pi B+ or newer you shouldn’t have to turn this on.
Music Files
- Scan Music Files: Enable this if you would like to scan for music files on boot. However, you could find that this slows down your boot time considerably.
- Network Drive: If you have a network drive setup that has all your music in it then you can set it in here. Make sure you enter the correct username and password.
- Resize Filesystem: This setting is very important if you’re looking to make the most of your SD card. Once you enable this and reboot you will gain access to the entire SD Card.
Services
If you’re looking use services such as Spotify, YouTube, Google Music, SoundCloud and much more then you will need to set them up in here. The setup for each of the services are pretty straight forward and are often explained if any extra information is required. More services may be added in the future.
That’s basically all the information you should need for setting up the music player correctly. There are a few things you should probably be aware of that I will quickly mention below.
Other things to note
Now with the Pi music box there are a few things that are mentioned you should probably be are of.
The software package is not secure enough to be run outside a firewall. Keep this in mind if you decide to connect to a public Wifi spot or you’re on an unsecure internet connection.
The passwords for the Spotify service and for a WiFi connection are stored in plain text on the SD-card. You can avoid the WiFi issue by setting it up manually and not using their inbuilt system but there is no workaround for the spotify service.
You should change the root login password if you decide to turn SSH on. As I mentioned above the password is a default so anyone who knows of the music box software can easily gain access to your system if SSH is enabled. (However they would need to be within your local network)
If you want to access the mopify GUI instead of the Pi MusicBox GUI you can simply enter the following into your browser.
musicbox.local/mopify
Again replace the musicbox.local with the IP of the Raspberry Pi if the hostname is not working. Once you have connected successfully you should get a screen like the one shown below.
Mopify is a GUI designed for spotify only so if you want to use the other services then you will need to use the Pi music box GUI.
I hope you now have a fully working Raspberry Pi music player up and running. If you do come across any troubles, have feedback or anything else then be sure to drop me a comment below.
View more at: http://bit.ly/1XReQFr
Post a Comment