In this tutorial I will be going the process of how to install Windows 10 IoT Core for Raspberry Pi 2. This has actually been a pretty highly requested tutorial so I thought I would put one together.
I very briefly go into coding and pushing applications to the device. If you need to learn more about doing, then I highly recommend taking a look at some of Microsoft’s documentation. I will have a tutorial coming in the future that will go into this but for now here is the tutorial for installing windows 10 IoT.
If you want to watch a video on how to get this all installed, then feel free to watch the one below. It takes you through all the steps to getting Windows 10 IoT onto your Raspberry Pi.
Equipment
To be able to install Windows 10 IoT on the Raspberry Pi correctly you will need the following pieces of equipment.
Required
Optional
You will also need a computer running Windows 10 to be able to complete the following process.
Install Windows 10 IoT Core for Raspberry Pi 2
Firstly, I will go through the process for installing windows 10 IoT and then how to connect to it.
- Firstly, download the windows 10 IoT core for the Pi 2 from the IoT Core download page.
- Once downloaded double click the ISO and it should automatically mount as a virtual drive.
- Open up the virtual drive and install “
Windows_10_IoT_Core_RPi2.msi” - Once installed a file called flash.ffu should be installed at the following location. “
C:\Program Files (x86)\Microsoft IoT\FFU\RaspberryPi2” - Now eject the virtual disk from your computer. To do this go back to file explorer and right click the virtual drive and select eject.
- Now insert your microSD card into a SD card reader. (If you don’t have one you can find them pretty cheap over at amazon.)
- Now open up “
WindowsIoTImageHelper” to install Windows 10 IoT to the SD card. - Select your SD card and the FFU file we found earlier. Once you have done this click flash.

- Now safely remove your SD card. If you don’t do this, you may end up having a corrupt SD card.
- It’s now completely installed and ready to be placed into the Raspberry PI.
Boot Up
Now insert the microSD card that we had just prepared into the Raspberry Pi 2. Hook up the network cable, HDMI, keyboard, mouse and finally the power supply.
Now turn the power on for the Pi and the Windows 10 IoT core will automatically boot. This will take a few minutes to boot up completely.
Once you see the windows logo the screen may go blank for a bit. This is normal after this you will see a screen asking you to select your language. Just use your mouse to select an option. Alternatively leaving it for 1-2 minutes will have the system skip the screen.
Once it has finished booting you will see a default application. This will display the IP address of your Raspberry Pi 2.
This completes installing Windows 10 for the Raspberry Pi 2. Below I will detail on how to connect and start building very own application built for Windows 10 IoT.
Connecting to Your Device
Now there are 3 ways you’re able to connect to your Raspberry Pi 2 Windows 10 device. I will quickly mention each method now.
Browser
This is probably the easiest method of connecting the IoT device. All you need to do is simply connect to it in your browser.
First check that the device is in the IOT core watcher. This application can be found at “C:\Program Files (x86)\Microsoft IoT” If it isn’t listed then it is probably not connected to network correctly.
Once you have verified the device is active just use the IP that was on the Pi screen earlier in the browser. Also include the port 8080 at the of your IP address. For example, mine is 192.168.1.115:8080.
IT will now prompt for a username and password. The username is administrator and the password isp@ssw0rd.

This will load up a device portal that contains configuration options & advanced diagnostic tools. These will help you be able to both troubleshoot and see real time performance of the Pi in action.
PowerShell
Another way you can connect is to use the PowerShell that is installed on Windows computers.
To connect using the PowerShell by doing the following instructions.
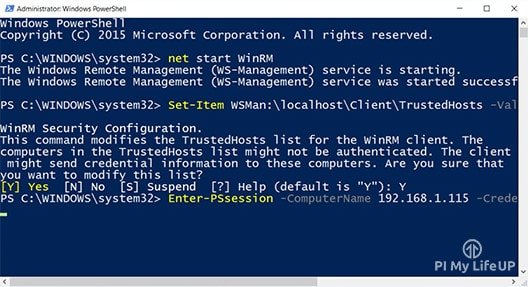
- First open up powershell as an administrator. You can find PowerShell by searching “Powershell”. To have it run as administrator simply right click and select “run as administrator”.
- Enter the following command into the console. Replace
[YOUR_PI_IP_ADDRESS]with your IP address.Set-Item WSMan:\localhost\Client\TrustedHosts -Value [YOUR _PI_IP_ADDRESS] - Once you have done this we can start a session with the device by entering the following command line. Again replace the following
[YOUR_PI_IP_ADDRESS]with your IP address.Enter-PSSession -ComputerName [YOUR _PI_IP_ADDRESS] -Credential [YOUR _PI_IP_ADDRESS]\Administrator - It will not prompt for a password. Enter the default password:
p@ssw0rd - It may take up to 30 seconds to complete the connection.
- You should now be fully connected to the Raspberry Pi Windows 10 IOT.

If you want to learn more about the PowerShell and the commands, you can use then be sure to check out Microsoft’s document page.
SSH
You connect using SSH this probably what you’re already familiar with as this is how control the Pi remotely in all the tutorials on this website.
You can also follow the SSH instructions below in order to use SSH to connect to your device.
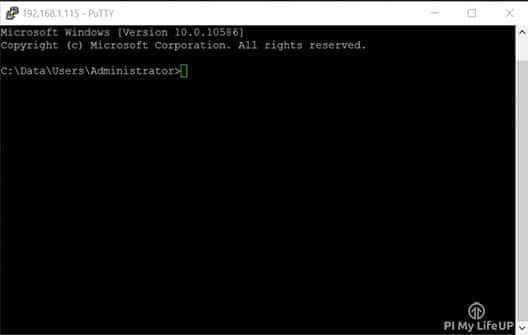
- Download & install Putty.
- Now in putty enter the IP into the hostname and use port 22.
- If it is your first time visiting, you will get a security alert. Just click yes in order to continue.
- It should now prompt you to enter the user name. The default username is:
Administrator - Next it will prompt you to enter the password. The default password is:
p@ssw0rd - Now you should have logged in successfully.

If you want to learn more about SSH and the commands, you can use head over to Microsoft’s documentation page.
Setting up Visual Studio for Windows 10 IOT Core
Lastly you’re probably going to want to setup visual studio so you’re able to start developing your own applications for Windows 10 IoT Core.
Installation
- First download & install visual studio community from this page. (This may take a while to download & install, for me it took about 8 hours).
- Once you have installed it simply press launch. It will not just do a bit of setting up. Stick with all the defaults unless you want something to be different.
- You will notice that there isn’t any IoT templates in the default installation. Click on the here link next to install Windows 10 IOT core project templates back on the page linked back.
- Once you have downloaded & installed the templates re-open visual studio.
- You will now notice there are now templates in the list. Select the one you wish to use.
- It will prompt you to activate developer mode on your Windows 10 device. Simply follow the prompts and activate it.
- Now simply code your application.
Pushing code to the device
- Once you’re ready to deploy your application to the Windows 10 IoT device go up the tab that has a green arrow in it.
- Press the black drop down arrow and select remote machine.
- Now in here either enter the IP of your device or you should be able to select it underneath automatic configuration.
- You should now be able to push code/applications to your Windows 10 IoT Raspberry Pi 2.
- I hope you now have learnt how to install Windows 10 IoT core for Raspberry Pi 2. If I have missed anything, you’re having troubles or anything else you would like to share then be sure to drop a comment below.
View more at: http://bit.ly/1XReQFr
Post a Comment